Featuring our $5 Yoga Studio Printable Dramatic Play Kit
This week's theme is "Y is for Yoga", and we're pairing it with our Yoga Studio Printable Pack, designed especially for sensory play and perfect for decorating your IKEA Flisat table. With the Yoga Studio Dramatic Play Kit, your FLISAT table becomes a calm little studio — kids check in students, lead classes with pose cards, and practice breathing between poses. The studio sits on the base from my sensory-table beginner guide, if yours is new.
🛒 What's in the $5 Yoga Studio Printable Pack
The Yoga Studio Printable Pack includes:
Yoga studio signage & class schedule
Printable yoga pose cards & mats
Yoga instructor accessories
Worksheets: letter Y tracing and calm-down activity pages
Vocabulary cards: yoga, breathe, stretch, balance, and more
6–12 mo: Tummy-time stretches on the mat; calm textures and sounds
1–2 yrs: Copying simple poses and animal movements
2–3 yrs: Balancing on one foot, following a two-step pose sequence
3–4 yrs: Letter Y tracing, naming poses, deep-breathing practice
4–5 yrs: Leading a mini class, sequencing a full pose flow, calm-down strategies
💌 Free Bonus: A to Z Letter of the Week Guide
Don't forget your Free Printable Letter of the Week Poster! Download the A–Z Letter of the Week Sensory Guide, with all 26 themes, links to products, and learning goals. You'll also receive the Letter of the Week Email Series, with weekly reminders, bonus activity ideas, and links to new blog content.
Featuring our $5 Doctor's Office Dramatic Play Kit
This week's theme is "X is for X-Ray", and we're pairing it with our Doctor's Office Printable Pack, designed especially for sensory play and perfect for decorating your IKEA Flisat table. With the Doctor's Office Dramatic Play Kit, your FLISAT table becomes a friendly doctor's office — kids check in patients, listen with stethoscopes, and study "x-rays" while they explore the world of medicine. New to the table? Here's how to set up a FLISAT table before your first patient arrives.
🛒 What's in the $5 Doctor's Office Printable Pack
The Doctor's Office Printable Pack includes:
Doctor's office signage & check-in setup
Printable doctor tools: stethoscope, syringe, and thermometer
Patient charts and checkup activity pages
Worksheets: letter X tracing and body-themed activity pages
Vocabulary cards: doctor, x-ray, patient, healthy, and more
6–12 mo: Watching, reaching, and cuddling soft patients during play
1–2 yrs: Naming body parts; gentle pretend checkups
2–3 yrs: Matching tools to their jobs, taking turns as doctor and patient
3–4 yrs: Letter X tracing, drawing bones on x-rays, counting heartbeats
4–5 yrs: Sequencing a checkup, simple body and bone facts, writing patient notes
💌 Free Bonus: A to Z Letter of the Week Guide
Don't forget your Free Printable Letter of the Week Poster! Download the A–Z Letter of the Week Sensory Guide, with all 26 themes, links to products, and learning goals. You'll also receive the Letter of the Week Email Series, with weekly reminders, bonus activity ideas, and links to new blog content.
This week's theme is "W is for Watermelon", and we're pairing it with our Smoothie Shop Printable Pack, designed especially for sensory play and perfect for decorating your IKEA Flisat table. With the Smoothie Shop Dramatic Play Kit, your FLISAT table becomes a smoothie bar — kids take orders, blend pretend watermelon smoothies, and pay with play money. I build this on our standard FLISAT table setup — bins, pegboard, and awning.
🛒 What's in the $5 Smoothie Shop Printable Pack
The Smoothie Shop Printable Pack includes:
Smoothie shop signage & menu
Printable fruit & ingredient pieces
Order tickets & play money
Smoothie cups & accessories
Vocabulary cards: watermelon, blend, smoothie, fruit, and more
6–12 mo: Bright fruit colors and scooping textures to explore
1–2 yrs: Filling and pouring cups; naming fruits
2–3 yrs: Following a simple order, counting fruit pieces, color matching
3–4 yrs: Letter W tracing, making change with play money, sequencing a recipe
4–5 yrs: Writing order tickets, inventing new smoothie flavors, simple fractions with cups
💌 Free Bonus: A to Z Letter of the Week Guide
Don't forget your Free Printable Letter of the Week Poster! Download the A–Z Letter of the Week Sensory Guide, with all 26 themes, links to products, and learning goals. You'll also receive the Letter of the Week Email Series, with weekly reminders, bonus activity ideas, and links to new blog content.
This week's theme is "V is for Vet", and we're pairing it with our Vet Clinic Printable Pack, designed especially for sensory play and perfect for decorating your IKEA Flisat table. With the Vet Clinic Dramatic Play Kit, your FLISAT table becomes a real animal clinic — patients check in, get examined in the bins, and head home with a health chart, while little vets build empathy with every appointment. New to the table? My IKEA FLISAT beginner guide walks through the table and bins this setup uses.
🛒 What's in the $5 Vet Clinic Printable Pack
The Vet Clinic Printable Pack includes:
Vet clinic signage & exam room setup
Printable animal patients & health charts
Vet tools & accessories
Appointment cards
Vocabulary cards: veterinarian, patient, checkup, healthy, and more
6–12 mo: Cuddling soft patients; watching and reaching during play
1–2 yrs: Naming animals and body parts; gentle-care practice
2–3 yrs: Taking turns as vet and pet owner, matching tools to jobs
3–4 yrs: Letter V tracing, filling in simple health charts, counting patients
4–5 yrs: Sequencing a checkup, writing appointments, empathy conversations
💌 Free Bonus: A to Z Letter of the Week Guide
Don't forget your Free Printable Letter of the Week Poster! Download the A–Z Letter of the Week Sensory Guide, with all 26 themes, links to products, and learning goals. You'll also receive the Letter of the Week Email Series, with weekly reminders, bonus activity ideas, and links to new blog content.
Featuring our $5 Unicorn Sensory & Dramatic Play Setup
This week's theme is "U is for Unicorn", and we're pairing it with our Unicorn Printable Pack, designed especially for sensory play and perfect for decorating your IKEA Flisat table. With the Unicorn Sensory & Dramatic Play Setup, your FLISAT table becomes a unicorn kingdom — rainbows, magical scenes, and storytelling in every bin. It all sits on our standard setup — here's how I set up our FLISAT if yours is new.
6–12 mo: Soft textures and high-contrast rainbow colors to explore
1–2 yrs: Scooping and pouring pastel filler; naming colors
2–3 yrs: Sorting gems by color, matching unicorns, counting stars
3–4 yrs: Letter U tracing, pattern rainbows, pretend storytelling
4–5 yrs: Inventing unicorn stories, sequencing a magical quest
💌 Free Bonus: A to Z Letter of the Week Guide
Don't forget your Free Printable Letter of the Week Poster! Download the A–Z Letter of the Week Sensory Guide, with all 26 themes, links to products, and learning goals. You'll also receive the Letter of the Week Email Series, with weekly reminders, bonus activity ideas, and links to new blog content.
Featuring our $5 Farm Animal Printable Dramatic Play Kit
This week's theme is "Q is for Quack", and we're pairing it with our Farm Animal Printable Pack, designed especially for sensory play and perfect for decorating your IKEA Flisat table. With the Farm Animal Printable Dramatic Play Kit, your FLISAT table becomes a busy little farm — ducks in the pond, animals to feed, and a farm stand to run, all built for storytelling and child-led play. New to the table? My FLISAT setup guide covers the bins and basics behind this setup.
🛒 What's in the $5 Farm Animal Printable Pack
The Farm Animal Printable Pack includes:
Farm-themed dramatic play pieces for role-playing and storytelling
Printable farm scene elements and animal pieces
Vocabulary-building farm pieces
Worksheets: letter Q tracing and farm-themed activity pages
Vocabulary cards: quack, duck, pond, farm, and more
6–12 mo: Feeling grains and listening to animal sounds you model
1–2 yrs: Scooping feed, splashing in the pond tray, first animal names
2–3 yrs: Matching animals to their homes, sorting by size, counting ducks
3–4 yrs: Letter Q tracing, animal sound games, simple farm jobs
4–5 yrs: Storytelling on the farm, sequencing a farmer's morning routine
💌 Free Bonus: A to Z Letter of the Week Guide
Don't forget your Free Printable Letter of the Week Poster! Download the A–Z Letter of the Week Sensory Guide, with all 26 themes, links to products, and learning goals. You'll also receive the Letter of the Week Email Series, with weekly reminders, bonus activity ideas, and links to new blog content.
Featuring our $5 Space Station Printable Dramatic Play Kit
This week's theme is "O is for Outer Space", and we're pairing it with our Space Station Printable Pack, designed especially for sensory play and perfect for decorating your IKEA Flisat table. With the Space Station Printable Dramatic Play Kit, your FLISAT table becomes a working space station — banners and awnings set the scene while astronauts complete missions, file reports, and explore the galaxy. If you're building the base setup first, my FLISAT table setup guide covers the table and bins.
🛒 What's in the $5 Space Station Printable Pack
The Space Station Printable Pack includes:
Space station banner and awning
Astronauts, planets, and mission decor pieces
Mission reports and astronaut activity pages
Fine motor activity pages
Vocabulary cards: astronaut, rocket, planet, orbit, and more
Don't forget your Free Printable Letter of the Week Poster! Download the A–Z Letter of the Week Sensory Guide, with all 26 themes, links to products, and learning goals. You'll also receive the Letter of the Week Email Series, with weekly reminders, bonus activity ideas, and links to new blog content.
Featuring the Jellyfish Printable Kit from our Letter of the Week Bundle
This week's theme is "J is for Jellyfish", and we're pairing it with our Jellyfish Printable Pack from the Letter of the Week series, designed especially for sensory play and perfect for decorating your IKEA Flisat table. The Ocean & Surf kit turns your FLISAT table into an underwater world — jellyfish drift above the bins while kids sort, scoop, and explore the deep. New to the table itself? My IKEA FLISAT beginner guide covers the setup these packs decorate.
🛒 What's in the Jellyfish Printable Pack
The Jellyfish pack is one of the 26 nine-page kits in the Letter of the Week Bundle, and includes:
"J is for Jellyfish" banner, awning, and ocean signs
Printable jellyfish and ocean scene pieces
Worksheets: letter J tracing and ocean-themed activity pages
Vocabulary cards: jellyfish, tentacles, ocean, drift, and more
3–4 yrs: Letter J tracing, learning how jellyfish move and drift
4–5 yrs: Ocean habitat talk — who lives near the surface and who lives deep down
💌 Free Bonus: A to Z Letter of the Week Guide
Don't forget your Free Printable Letter of the Week Poster! Download the A–Z Letter of the Week Sensory Guide, with all 26 themes, links to products, and learning goals. You'll also receive the Letter of the Week Email Series, with weekly reminders, bonus activity ideas, and links to new blog content.
Trick-or-Treat Tips for Toddlers: A First-Halloween Survival Guide
Your toddler's first Halloween night is less "epic candy haul" and more "twenty minutes, six houses, done." Here's how to keep them safe and visible, what to expect, and why quitting early counts as a win.
Best forAges 1–4 (first timers)
Time20–45 minutes out
CostFree (beyond the costume)
SkillsIndependence + social practice
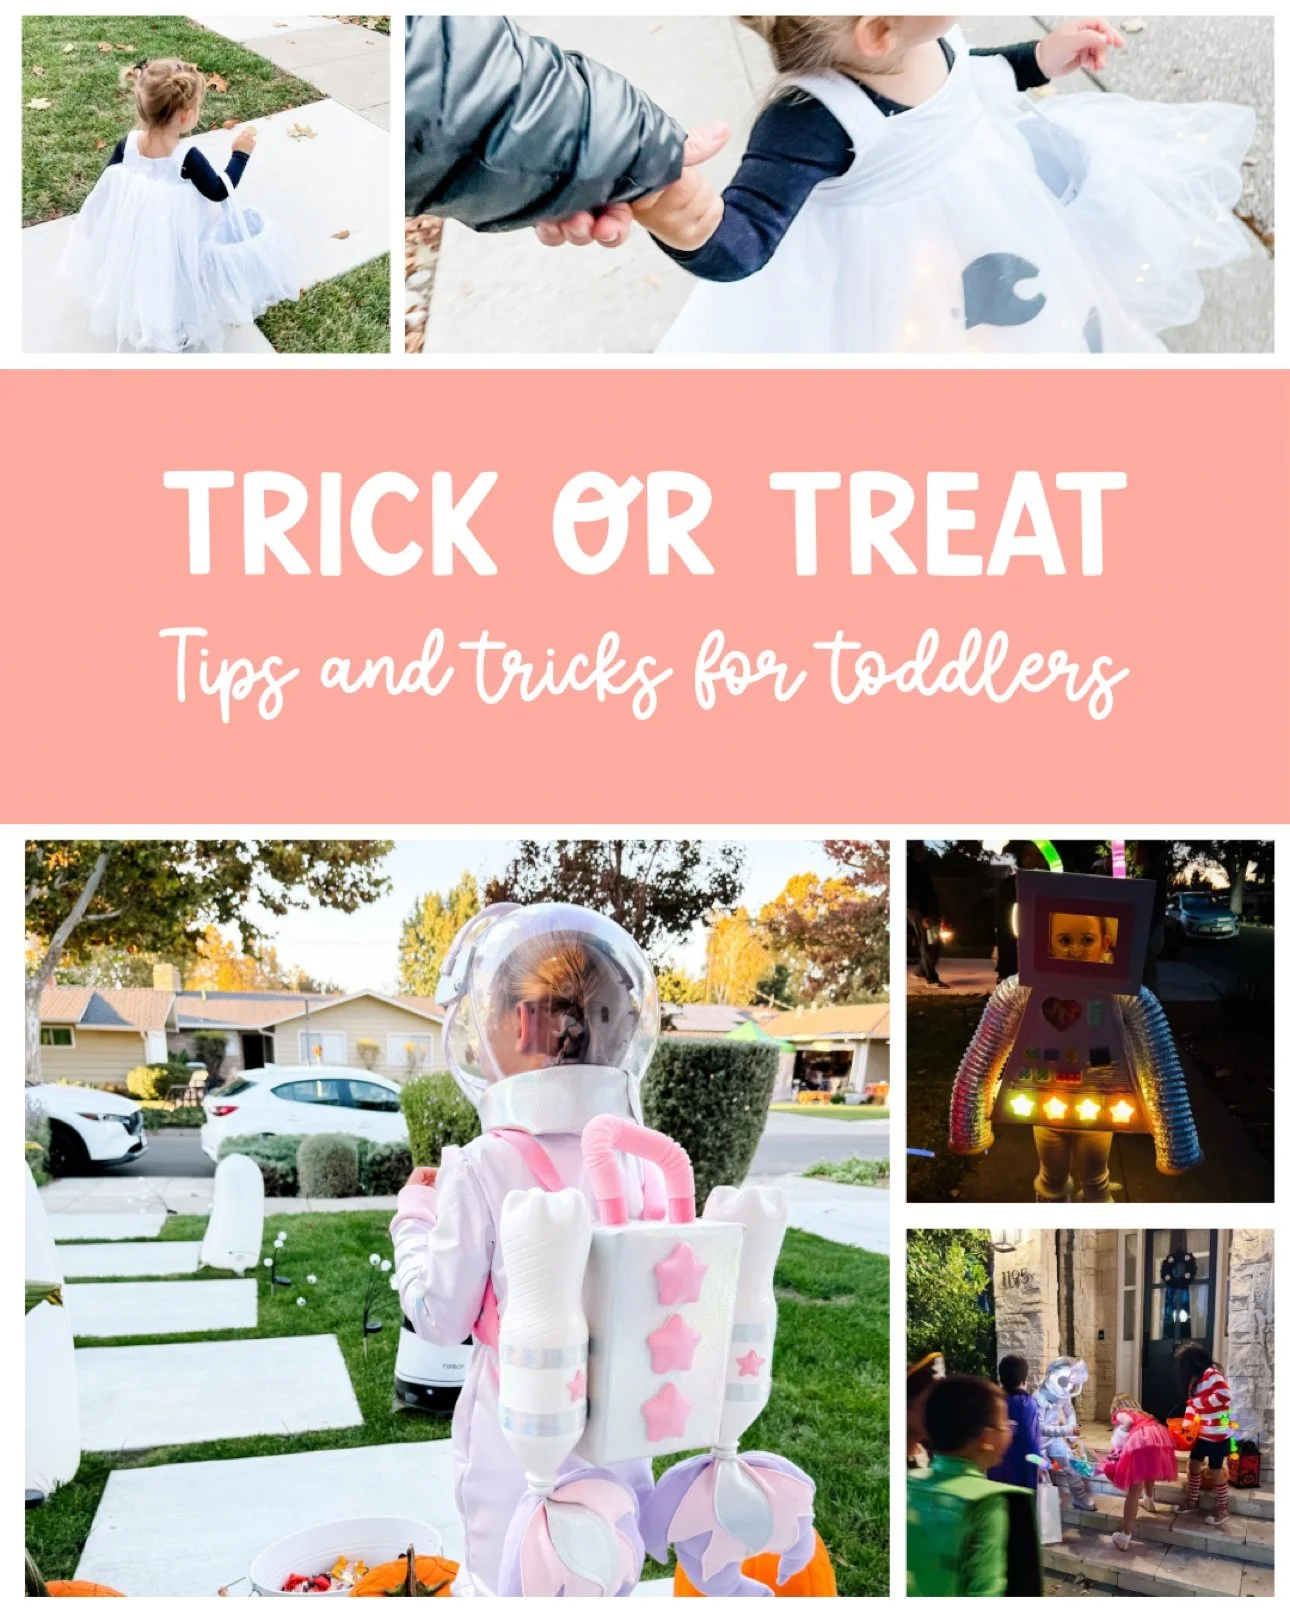
Our favorite toddler costumes over the years — ghost, astronaut, and the robot that lights up after dark.
When she was three, we took my daughter trick-or-treating for the first time. She'd practiced saying "trick or treat!" for a week. She made it six houses, put exactly four pieces of candy in her bucket, sat down on somebody's lawn, and announced she was done. We went home, she ate one lollipop, and she talked about those six houses for a month.
That's the thing nobody tells you: a toddler's Halloween night is small, and small is perfect. The goal isn't a full bucket. It's a first taste of the magic — the doorbells, the porch lights, the neighbors in costumes — without the overtired meltdown. Everything below is what we learned the practical way.
Before the big night
Almost everything that goes wrong on Halloween night can be prevented in the living room, two days earlier. Toddlers don't generalize well — the costume has to be a known, comfortable thing before the porch lights come on.
1. Do a full dress rehearsal
Have them wear the complete costume — shoes, hat, mask, everything — and walk around the house for ten minutes. If the cape drags, if the mask slips, if the shoes pinch, you want to find out now, not at the third house. The American Academy of Pediatrics puts it plainly: costumes should fit well so kids aren't encumbered by them, and they need to see clearly around any masks, hats, or wigs. A toddler who can't see the curb is a toddler who's going to trip on it.
Dress rehearsal at home — the robot head test run, two days before the big night.
2. Face paint beats masks, every time
A mask on a toddler lasts about ninety seconds before it's on the ground — and while it's on, it narrows their vision to a tunnel. Simple non-toxic face paint (a nose, some whiskers, a star on the cheek) stays put, doesn't fog, and lets them actually see the neighbors. When she was little, we did the smallest possible face paint and skipped the mask entirely; she kept the paint on all night and the "costume" was just clothes she could move in.
3. Pick a costume they can move in
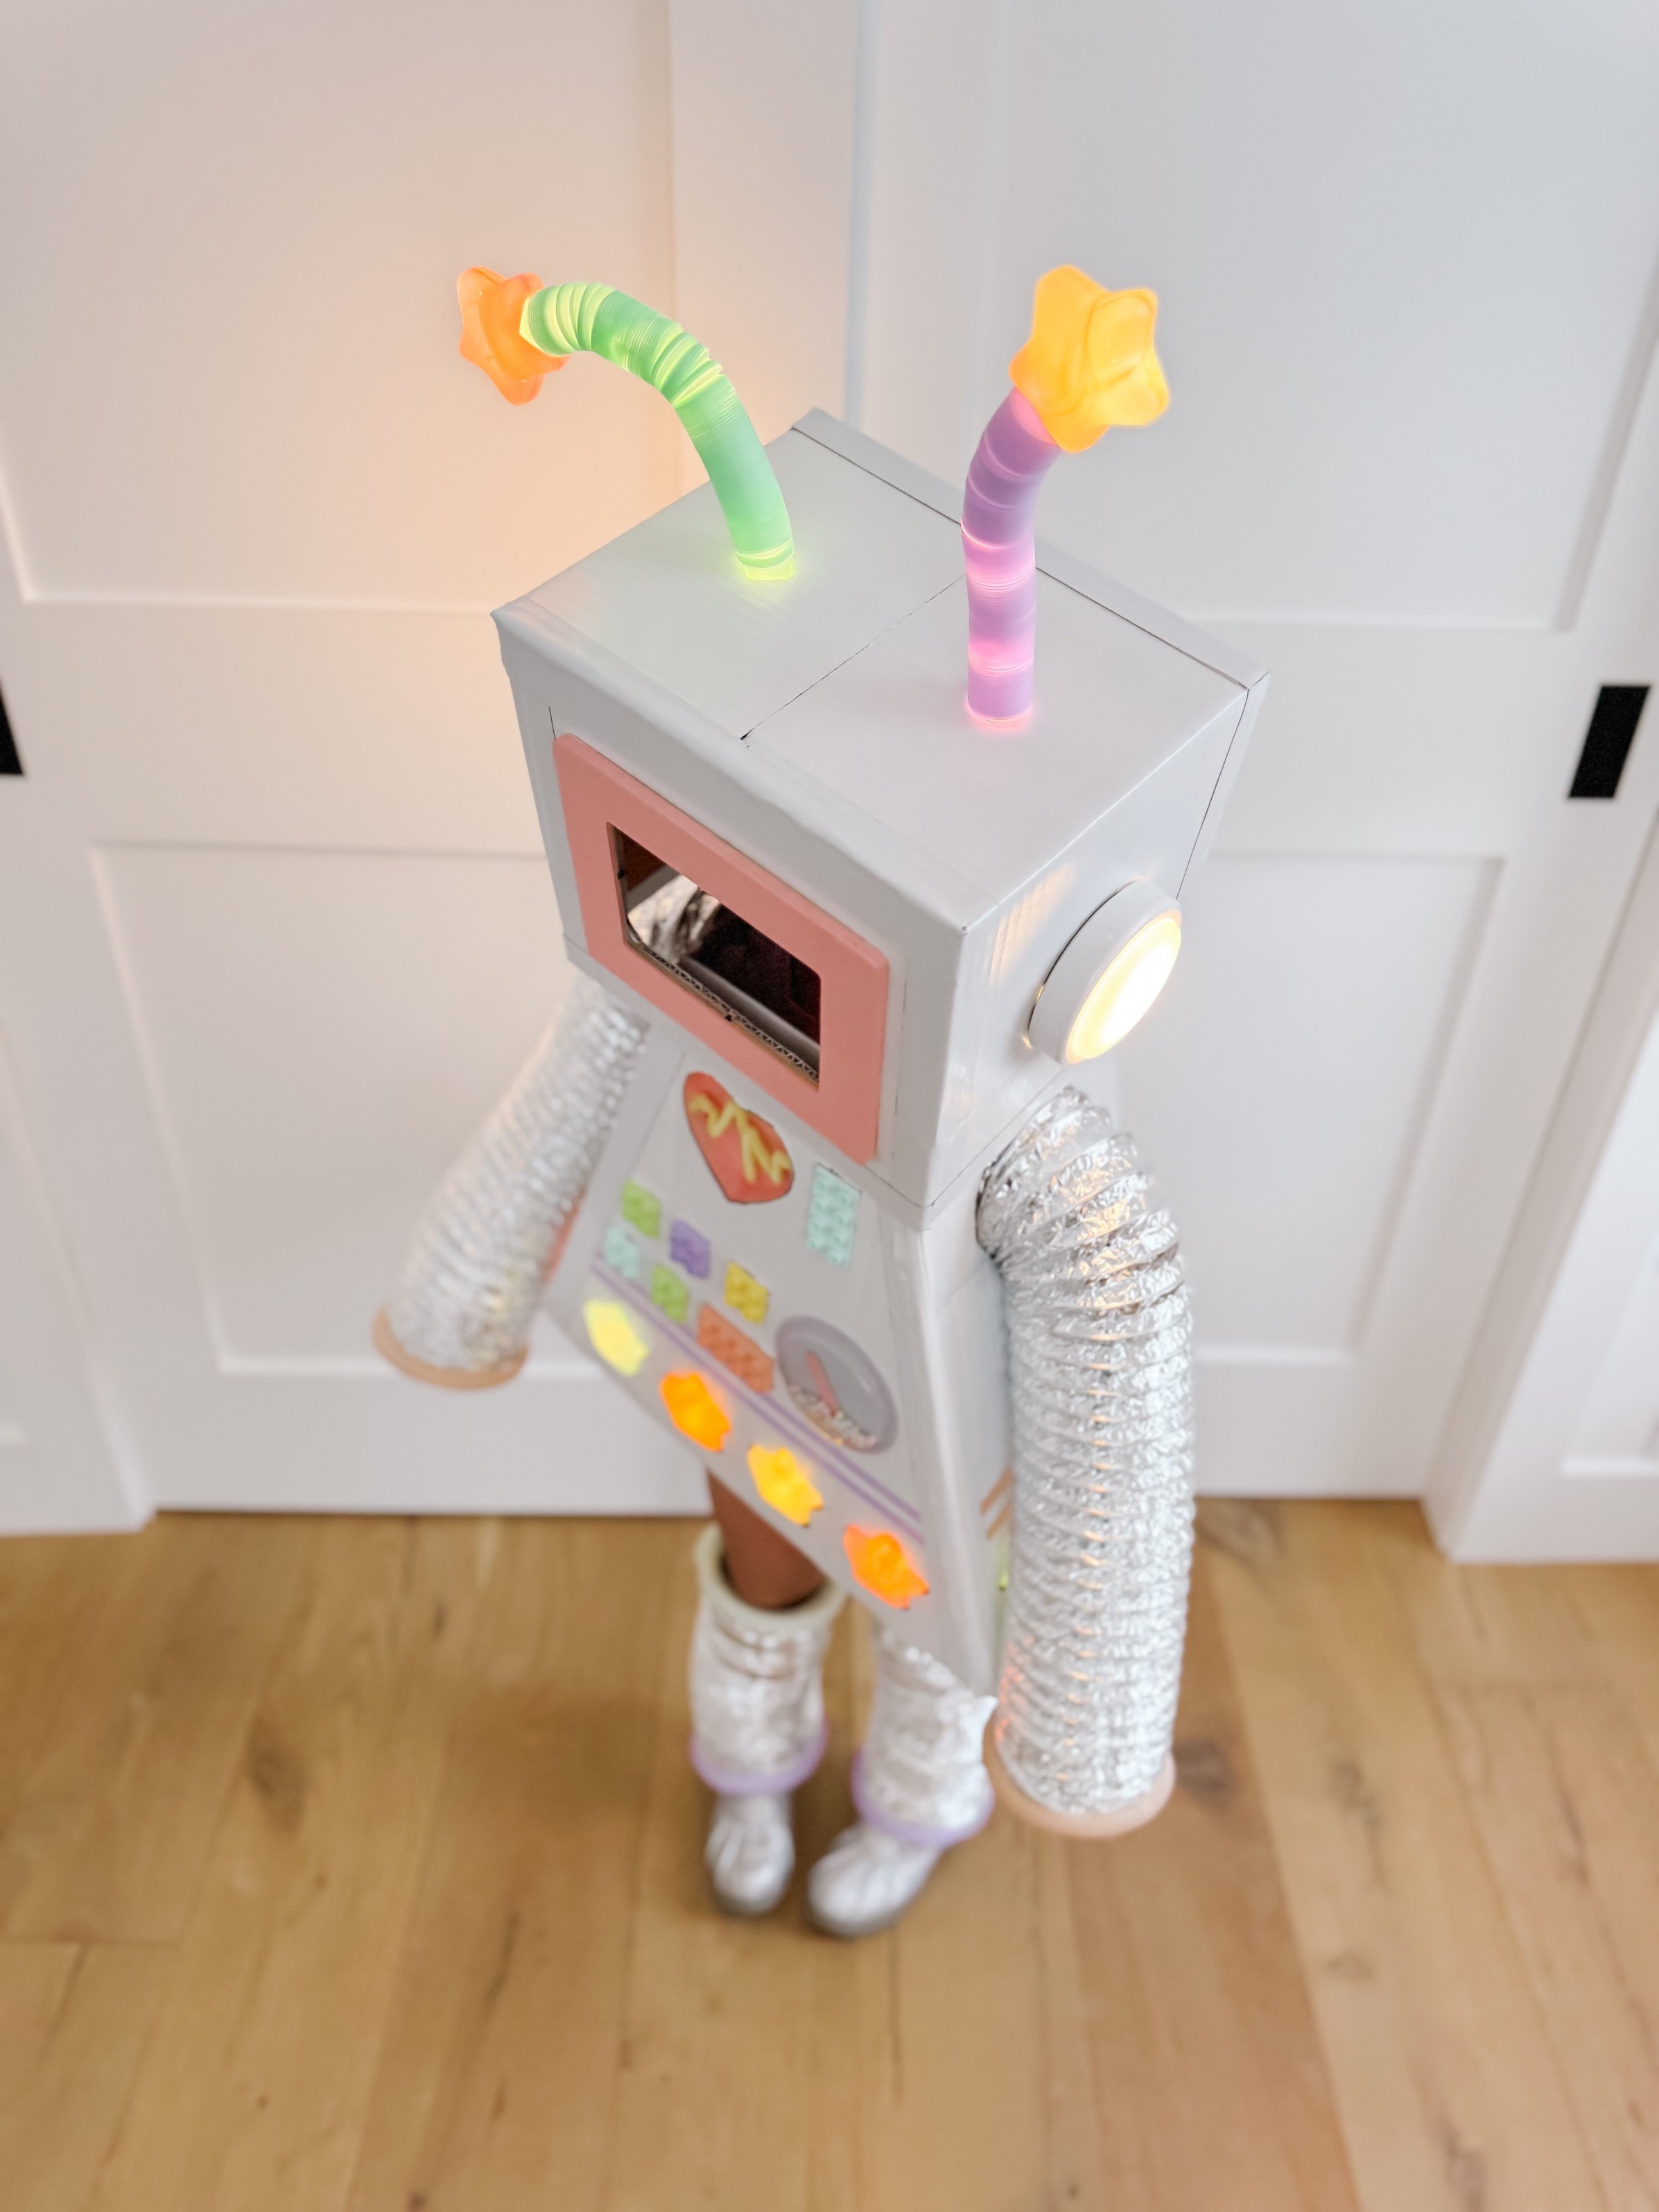
The fanciest costume is the one they'll refuse to wear by house four. Toddlers do best in costumes that are basically pajamas with a theme: a superhero tee over warm layers (our superhero costume tutorial is exactly this), a witch dress over leggings (our pink witch costume with free printable pattern templates), a cardboard robot box they can take off when they're done (our DIY robot costume). If it can't survive sitting on a curb, it's the wrong costume for this age.
The finished robot, checked and ready. If it can't survive sitting on a curb, it's the wrong costume.
Make them visible after dark
This is the one safety section that matters most, and the pediatricians are unanimous about it: after dark, drivers need to see your child. Dark costumes look appropriately spooky and appropriately invisible to cars.
1. A costume that lights up is the gold standard
The best visibility trick we ever used wasn't tape or a flashlight — it was a costume that lit up by itself. Our DIY robot costume has lights built right into the front, and out on the street it did two jobs at once: drivers could spot her instantly, and we could find her in a pack of kids at a glance. If you're choosing or making a costume anyway, built-in lights are the feature to look for — a lit-up kid is a findable kid.
The robot costume after dark — built-in lights make her easy to spot (and easy to find).
2. No lights? Glow sticks are the backup plan
If the costume doesn't light up, a glow-stick necklace and bracelets get you most of the way there — drivers see them, and your toddler won't put down the thing that makes them glow. When she was three, the glow bracelet was honestly the highlight of the night — she forgot about the candy and just admired her wrist. A small flashlight works too, and toddlers love being in charge of the beam.
3. Reflective tape still helps
The AAP's Halloween guidance specifically calls for reflective tape or striping on costumes and trick-or-treat bags when kids are out after dark. A few strips on the back of the costume, one on the bucket — it takes two minutes and it glows in headlights. Silver tape on a dark costume even looks like part of the design.
4. Stay on lit streets, one side at a time
Pick a route on well-lit streets you already know, and work one side of the street down and the other side back — it halves the street crossings. Only visit houses with the porch light on (that's the universal "we're participating" signal), and keep to the sidewalk; don't let them cut across lawns or dart between parked cars.
The route plan
Toddlers don't need a plan — you do. A loose one, held lightly.
1. Go early
Start at dusk, not full dark. The light is better for little legs, the streets are calmer, and you'll be home before the older kids come out in force. Most toddlers are winding down by 7:30 anyway — Halloween night is not the night to fight the bedtime clock.
2. Keep the loop tiny
Your street, or one block. That's it. Tell the other adults the loop in advance so nobody suggests "just a few more houses" when the toddler is clearly fading. Six houses done happily beats twenty houses ending in tears — and next year they'll remember the fun part, not the distance.
3. You go with them. Always.
An adult walks with every toddler, to every door. Toddlers don't go up to doors alone, don't enter anyone's home (even a friendly neighbor's — make it a standing rule now), and stay on the porch while you stand at the bottom of the steps. The AAP guidance is direct: young children should always be accompanied by a responsible adult.
4. Hand-holding is the standing rule
Set it before you leave the driveway: on the sidewalk, in the street, at every crossing — you hold hands. Toddlers accept reminders they hear constantly and cheerfully ("hands!" at every curb becomes a game), and it matters most in the exact moment a car turns the corner or another kid group surges past. Practice the rule on the walk to the first house, not the walk home.
5. Pick a lost-and-found word
Before you go out, agree on one loud, unusual word your toddler can shout if you ever get separated — something that cuts through a street full of "trick or treat!" noise. Pick a word or family call they already know from home, and practice it like a game beforehand: shout it, and a grown-up comes running. A toddler who gets turned around in a crowd of costumes can't describe where they are, but they can be loud on cue — and you'll hear that one word over everything.
6. Feed them dinner first
A toddler hitting the candy circuit hungry is a toddler who will eat six pieces of candy at house three and be miserable by house five. A real dinner first means the candy is a treat, not the meal — and it buys you the whole loop before the sugar crash arrives.
Candy rules that save the night
The candy is the point, for them. The candy management is the point, for you. Set the rules at home, before the first doorbell, when everyone is still rational.
1. Nothing gets eaten until the home inspection
This is straight from the pediatricians: no treats until they're home and an adult has looked everything over. Check for rips or tears in the packaging, toss anything unwrapped or homemade, and skip anything that looks tampered with. When she was little, we made the sorting part of the fun — she dumped the bucket on the rug and we "inspected" together, which felt like a second round of trick-or-treating.
2. Pull the choking hazards
Hard candies, gum, peanuts, and small toys are choking hazards for under-threes — the AAP specifically flags these. Sort them out during the inspection and set them aside for older kids or the trash. Nobody misses what they never saw.
3. Make the candy plan before the big night
Decide the plan at home, days ahead, and tell your toddler what it is — the plan only works if it's not a surprise. Pick the version that fits your family: trade-in (the bucket gets traded for a present the next morning — the "candy fairy" leaves a toy in exchange), a number limit (they keep ten pieces, or one small bowl's worth, and choose them at the sorting table), or a sharing plan (some for them, some for mommy and daddy, some saved for friends). Announce it cheerfully at the sorting table, not mid-loop when they're holding a full bucket. Toddlers accept limits they knew were coming; they rebel against limits that appear mid-hug with a candy bucket.
What you can stop stressing about
The tiny candy haul. Six houses and four pieces of candy is a complete, successful first Halloween. The haul grows with the legs — this year is about the doorbells.
That they won't say "trick or treat." Half of toddlers just stare at the neighbor, grab the candy, and walk away. The neighbors expect it. A wave counts.
The scary house. If a yard looks too intense, skip it — no explanation needed. Toddlers can't tell "fun scary" from "actually scary," and a frightened two-year-old won't be comforted by "it's just pretend."
The perfect costume photo. The porch-light photo where they're mid-blink in a crooked hat is the one you'll actually love. Get the photo, then put the phone away and be on the loop.
Quitting early. Sitting down on someone's lawn and announcing you're done isn't a failure — it's a toddler who had exactly as much fun as they wanted. That is the win.
Some links are affiliate links. We only share things we actually use.
Free Halloween fun to go with the night
The costumes get the photos, but the activities are what fill the week before Halloween. Our free October collection has the season's printables and play ideas — potion trays, pumpkin crafts, and not-too-spooky activities sized for toddlers — so the big night is the finale, not the whole event.
There's no official age — it depends on the child. Most families start around age 2 or 3, when the toddler can walk the loop (or ride in the stroller for part of it) and understands the basic idea. Under-twos do great as passengers: dress them up, carry them to a few doors, and call it a night.
How long should trick-or-treating last with a toddler?
Plan for 20–45 minutes, and let the toddler end it whenever they're done. A short, happy loop beats a long one that ends in tears — and the "we quit while it was fun" version is the one they'll remember fondly.
Should toddlers trick-or-treat in the dark?
Start at dusk while there's still light, and if you're out after dark, make visibility the priority: reflective tape on the costume and bucket, glow bracelets, a flashlight, and well-lit streets only. The pediatric guidance is clear that costumes need reflective elements for after-dark outings.
Can my toddler wear a mask?
They can, but most toddlers won't keep one on — and masks narrow their vision, which matters on dark sidewalks. Non-toxic face paint gives the same effect without the slipping, fogging, or tripping hazard.
What do I do with all the candy?
Inspect everything at home first (toss unwrapped, homemade, or suspicious-looking pieces, and pull choking hazards for under-threes). Then follow the candy plan you made before the night — a trade-in for a present, a number limit they pick at the sorting table, or a sharing plan. Decide it in advance and announce it cheerfully at the sorting table.
Make star shaker wands with toddlers — clear fillable stars, glitter, and wooden dowels become a sparkly sensory craft. Full tutorial, materials list with links, and tips.
Have a shop that specializes in baby gifts? I'd love to feature your shop and products in one of my weekly roundups. Email me at goodnightfoxstudio@gmail.com.